

Backcountry Pre-Mortem: How to Spot Single Points of Failure Before the Trail
Most backcountry safety advice focuses on what to do when things go sideways: How to build an emergency shelter. How to signal a helicopter. How to treat a pit viper bite.
While essential, this approach misses the single most effective safety tool available: preventing the emergency from happening in the first place.
Search and Rescue (SAR) logs reveal that catastrophic wilderness failures rarely stem from sudden, unavoidable acts of nature. Instead, they are the result of cascading small errors—a missing piece of gear, an ignored weather shift, or an uncommunicated physical limitation—compounded by human psychology.
To eliminate these blind spots before stepping onto the trail, adoption of a proven framework from project management is essential: The Pre-Mortem Protocol.
What is a Backcountry Pre-Mortem?
A standard post-mortem happens after a failure to figure out what went wrong. A pre-mortem happens before the trip starts, operating on a single premise:
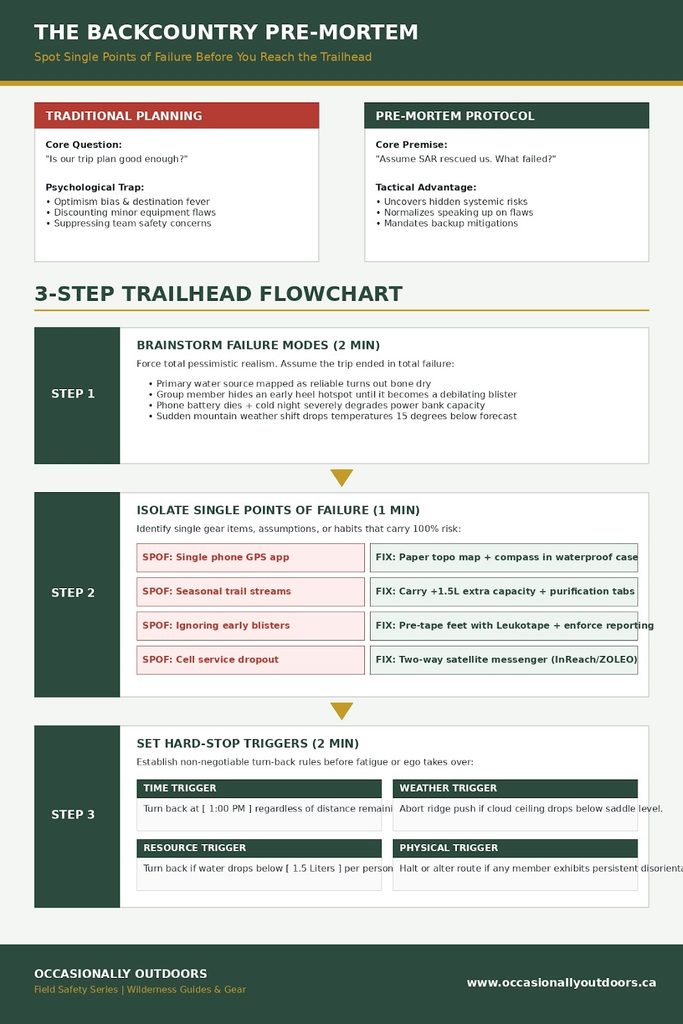
“Assume it is 48 hours from now. The trip ended in absolute failure, and Search and Rescue had to be called. What happened?”
By framing the trip as a guaranteed failure before leaving the driveway, cognitive biases that usually blind people during planning are bypassed.
Overcoming Trail Psychology
The pre-mortem directly counters three dangerous heuristic traps that affect solo hikers and experienced groups alike:
- Destination Fever: The overwhelming drive to reach a summit or campsite, blinding individuals to obvious hazards along the way.
- Optimism Bias: Assuming that because a setup worked on the last three trips, environmental conditions won’t change this time.
- Social Proof: Group members suppressing concerns because no one else is speaking up, assuming someone else has double-checked the plan.
Executing the 5-Minute Pre-Mortem Protocol
Set a timer for five minutes over coffee while finalizing gear at home or at the trailhead.
Step 1: Brainstorm the Failures (2 Minutes)
Everyone in the group (or you, if solo) writes down every plausible reason the trip could fail, no matter how minor. Encourage pessimism.
- “The reliable water source on the map is bone dry.”
- “Someone gets a heel blister at mile 3 and doesn’t say anything until mile 8.”
- “The navigation app crashes and the backup battery pack fails.”
- “A sudden temperature drop turns cold rain into hypothermic conditions.”
Step 2: Identify Single Points of Failure (1 Minute)
Look for SPOFs—single gear items, assumptions, or decisions that, if compromised, collapse the entire plan.
- Bad: Relying on one phone for maps, photos, and satellite communication.
- Good: Carrying a primary digital map, a secondary offline device, and a printed paper topo map with a magnetic compass.
Step 3: Establish Hard-Stop Triggers (2 Minutes)
Define non-negotiable, objective turning-back points before ego and fatigue influence judgment.
- Time-Based: “If we are not at the ridge by 1:00 PM, we turn around immediately, regardless of weather or energy.”
- Weather-Based: “If cloud cover drops below the saddle level, we abort the summit push.”
- Resource-Based: “If we drop below 1.5 liters of water per person before reaching Point B, we halt to filter or turn back.”
Download the Field Sheet
To help streamline this process for every outing, a printable template has been added to the resource hub.
- Downloadable Asset:[Trip Pre-Mortem & Float Plan Matrix (PDF)]
- Includes a structured 5-minute pre-mortem checklist.
- Features a standardized SAR Float Plan to fill out and leave with a trusted contact at home (including vehicle info, exact trailheads, planned route, and emergency contact windows).
Print a copy, run the protocol, leave the float plan on the kitchen counter, and head out with absolute confidence in the plan.
